OpenClaw is an open-source personal AI assistant that runs on your own server, giving you complete control over your AI helper while keeping your data private.
Table of Contents
Open Table of Contents
What is OpenClaw?
OpenClaw is an open-source personal AI assistant that runs locally on your server. Unlike cloud-based AI assistants, OpenClaw gives you:
- Full control — customize everything to your needs
- Automation superpowers — automate repetitive tasks, schedule reports, manage tasks
- Multi-channel access — interact via Telegram, WhatsApp, Discord, or web chat
Think of it as having your own personal AI assistant that’s available 24/7, never forgets context, and gets things done.
Why Run on a VPS?
While you can run OpenClaw on a local machine, a VPS (Virtual Private Server) offers significant advantages:
| Benefit | Description |
|---|---|
| Always Available | Your assistant is online 24/7, even when your computer is off |
| Public Access | Access from anywhere via Telegram or other channels |
| Better Reliability | Professional hosting with uptime guarantees |
| Continuous Automation | Run scheduled tasks (cron jobs) reliably |
Popular VPS providers include DigitalOcean, AWS EC2, Linode, Hetzner, or Railway. For personal use, I use DigitalOcean.
Setup Steps
Step 1: Set Up Your VPS
- You can chose DigitalOcean droplet, or Heztner, etc
- Ensure you can SSH into it. I use Termius.
Step 2 : Install Openclaw & configure it
- OpenClaw requires Node.js. Install it first
- Install OpenClaw using NPM and configure it
# Install OpenClaw globally
npm install -g openclaw

# Initialize (follow the wizard)
openclaw init

# Configure. The wizard guides through AI model, channels
openclaw configure
Step 3 : Configure Telegram bot
- Open Telegram and search for @BotFather
- Send
/newbotto create a new bot - Follow the prompts to name your bot
- Copy the bot token (you’ll need it)
openclaw config set channels.telegram.enabled true
openclaw config set channels.telegram.botToken "YOUR_BOT_TOKEN"
openclaw config set channels.telegram.dmPolicy "open"
OpenClaw will now be running on your VPS!
Step 4 : Start openclaw in TUI
- Start openclaw in terminal with
openclaw tui
Setup key features
1. Memory System
OpenClaw can remember context across conversations:
# Enable memory
openclaw config set agents.defaults.memorySearch.enabled true
This lets your assistant remember previous conversations, preferences, and important details.
2. Web Search
Enable web search for your assistant:
openclaw config set tools.web.search.enabled true
openclaw config set tools.web.search.provider "brave"
# Add your Brave API key
openclaw config set tools.web.search.apiKey "YOUR_BRAVE_API_KEY"
3. Scheduled automated tasks
Set up cron jobs for automation:
# Add a morning briefing cron job
openclaw cron add --schedule "cron 0 9 * * *" \
  --sessionTarget main \
  --payload '{"kind":"systemEvent","text":"Run morning brief"}'
Setup mini assistants
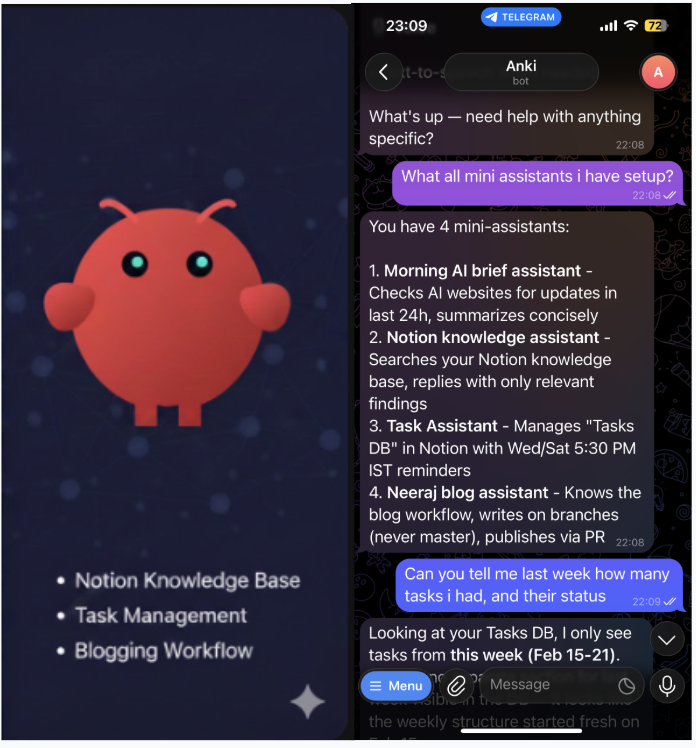
Here are some real-world examples of what you can automate:
- Morning AI Digest : Every morning at 8:30 AM, get an AI news digest:
- Task Assistant : Connect to Notion or task management tools to record/update tasks and set reminders
- Knowledge Assistant : Connected my notion for knowledge assistant
Start small, set up the basics first, then explore advanced features as you get comfortable. The beauty of OpenClaw is that it grows with your needs.
Ready to try? Spin up a VPS, install OpenClaw, and message your new personal assistant on Telegram!
Have questions or run into issues? Check the OpenClaw documentation or join the community on Discord.